The Neon Output Node depends on serverless postgresql backend to ensure your data tooling thrives with cool features. Like unblocking postgresql’s upsert – built in an easy user experience.
This Node syncs with your Data Lake, enabling users to gain data from any data in their Data Lake, from any workflow, and begin building their solutions from here.
To avoid spilling all the pop corn here (which is a lot for intro paragraph), will start now.. but before we do…
Next blog; will be about our first implementation of data visualizations in ET1.1 Neon!
How to use Neon Output Node
The Neon Output Node is in the ET1.1 Neon edition. Contact us for demo.
- access et1.1 neon
- login ET1.1 with github Oauth
- add data to ET1.1
- The CSV Input Node, the JSON Input Node, the Manual Table Node…
- Or send data to Neon Lake using the ET1.1 Neon Input Node.
- send data to Neon Output Node input connection
- decide how you want to write data to the database
Note: We have a limit of 19 free spots available for testing. Happy to have you join beta.
The Neon Output Node UX
The User Experience is unique, and kicks off the future of how we build our UX. With these simple buttons packaging a bit under hood. To make life easier. The Neon Output Node Write modes all interact with the “Notification Center” which elaborate more on how Append, Upsert and Overwrite work.
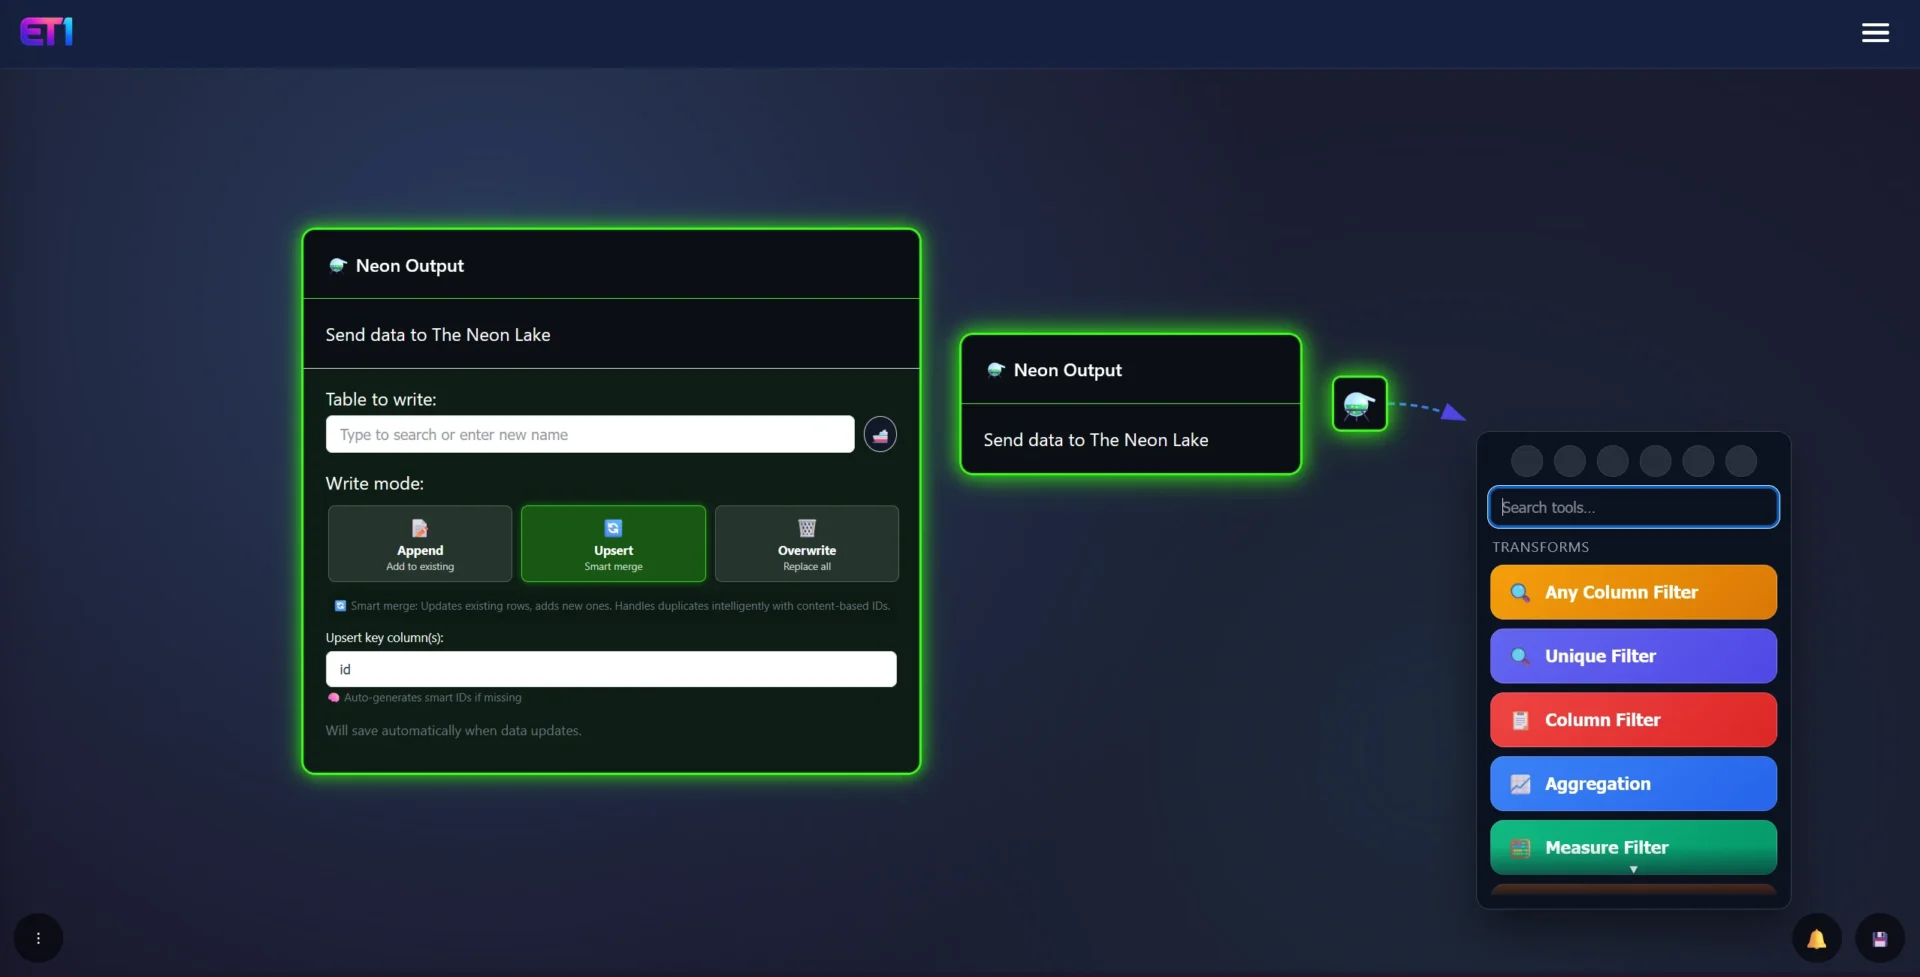
- Table to write: TYPE THE TABLE NAME or search for existing table
- Ship emoticon: “ship it” or in other words send it to the database immediately
- ET1.1 automatically sends data when you save and shipping isn’t required
- Append: add data to existing Table
- Upsert: add data like postgresql upsert
- Overwrite: replace entire table
- Upsert key column is only relevant on upsert
The Neon Output Warning…
Warning: The Neon Output Node is designed for ease of use but has the potential to cause damage, “sh1t i deleted everything” kind of vibes that should be considered, and only 1 click away. Good once you understand, bad if you’re not careful.
It’s intended for those aspiring to become proficient database users, and understand the ramifications of such a click. Well, to achieve said mastery, it’s essential to have a thorough understanding of the tooling we all must rely on.
ET1.1 is designed to aid in understanding how to troubleshoot database issues. As in the real world of databases, always test your actions as if they were critical. Use sample data for learning, never use production or client data until you are fully prepared.
Table to write
Type the name of the table you want to create, or wildcard search for the table that is already created.
If the table already exists, what buttons you have selected, like “upsert” and “overwrite” may be destructive behavior given the level of automation happening, be advised you will want to test before using these tools to ensure you’re gaining the results you’re expecting.
By finding an existing table, the value is you can create many workflows and write all of them to the same table, or started from the same table using the Neon Input Node.
Append
Append will push data to the bottom of the table, repeatedly, making it ideal for logging data in situations where you want to retain all information indefinitely, such as monitoring dynamic data like weather.
This creates a unique primary key. The update and create timestamps will be identical.
Upsert
Starting with the tech talk from postgresql website: upsert in postgresql.
The end of this url, you’re expected to first know about Primary Keys, Database implementations, and the ability to thread information through this upsert automatically as data happens. Something we do for clients in our data engineering consulting services and this style of solving has felt rather blocked, until ET1.1 – so we hope this is exciting for people interested in data pipelining with a user friendly Upsert solution.
Upsert intelligently removes dupes, creates unique primary key, inserts data and updates data.
How it creates a primary key in the upsert
The creation of the primary key maybe impactful for your data flow so develop accordingly or benefit from the abilities.. The PK built by checking for a unique key first, if it can’t find one, it has to create one to fully function.
If it can’t find a unique key it will automatically create a unique key based on the concat() of all the data at a row level. This can be both helpful and intuitive for moving towards migrating flat files to single source of truth, and not beneficial depending on your use case, so think about your use case.
You can also set the primary key to avoid the intelligent processing.
Overwrite
Erases the data in the table and starts over.
There’s not undo buttons, the data is gone forever, you’re committing this action on a database!
We are not keeping copies of your old data that is overwritten.
This can be considered a very destructive button but used correctly, there’s a high chance this is the button you need. Otherwise upsert is set to default because there’s a higher chance you will want to avoid deletion and merely “update” that row.
Please, if you’re trying to keep the data in the table, don’t click this button, please consider what you’re clicking here.
Notification center
When interacting with Neon Output for the first time it’s good to get acquainted with it first.
So, we created a logging system for the Neon Output Nodes.
In screenshot below, you can see what happens if we append data to tables in the Neon Lake.
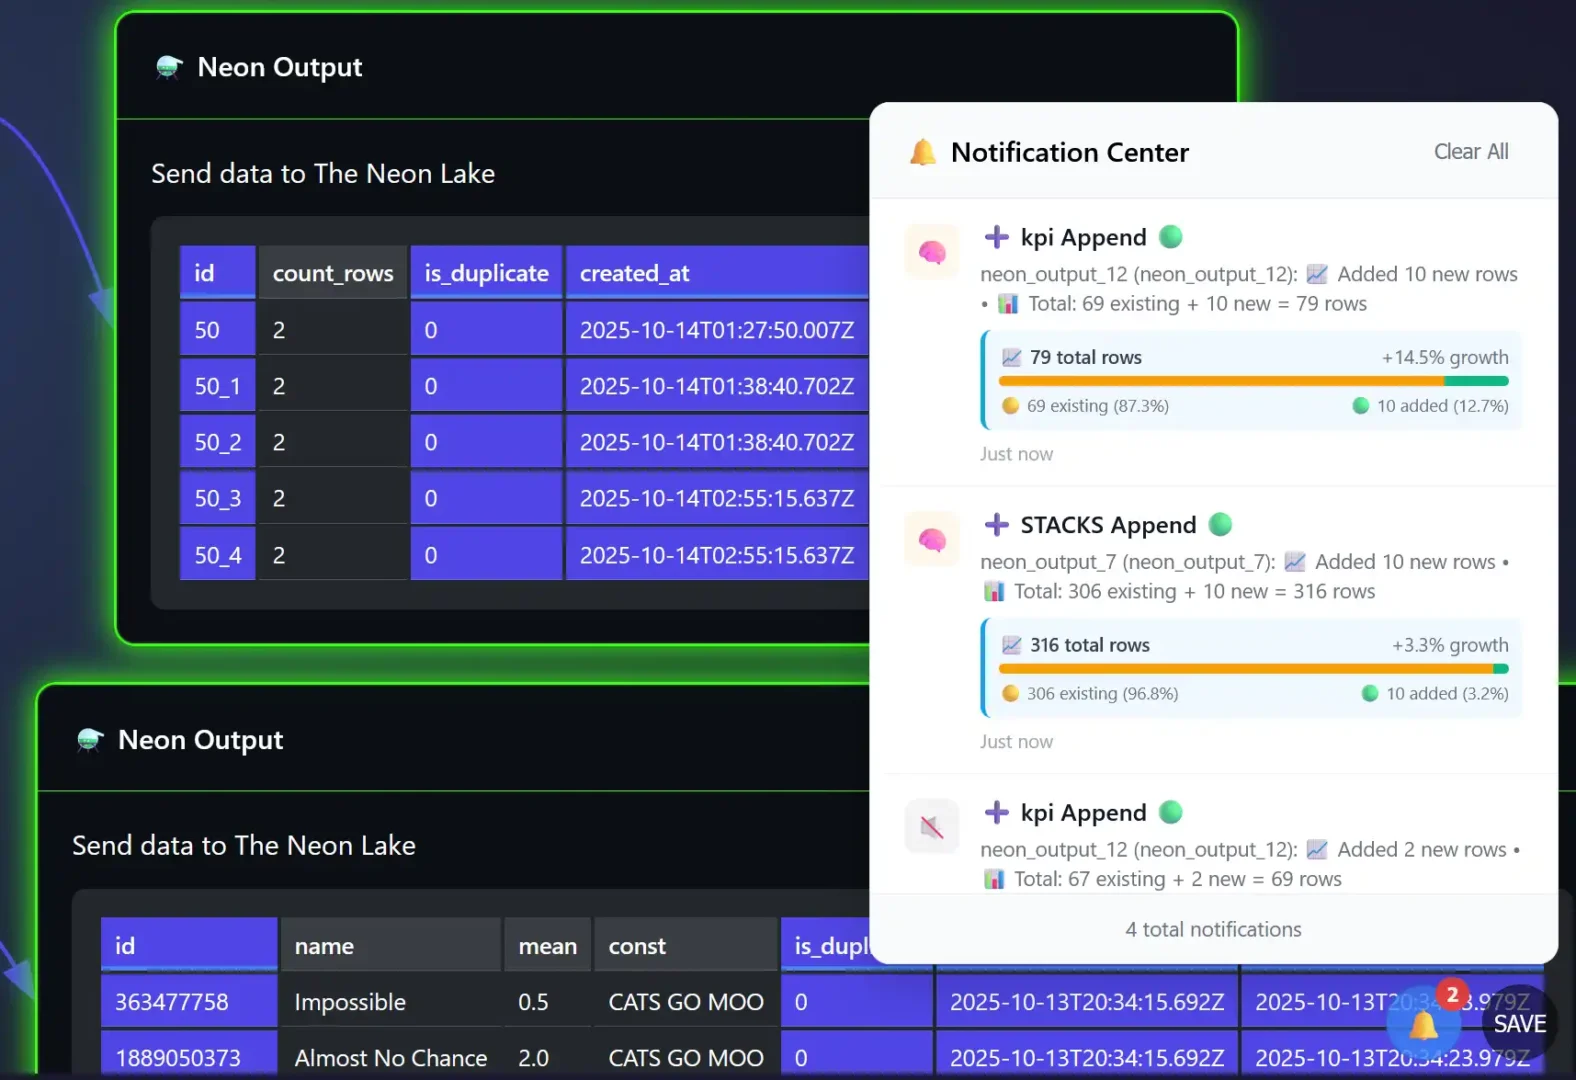
Each variation has its own method and way of explaining what just happened, we recommend testing in this area with fake data, store the data in a replicated Table.
Confusing contact us.
Thanks for checking out Neon Output node by DEV3LOPCOM, LLC
We appreciate your interest, contact DEV3LOPCOM, LLC for more information. Did you know Dev3lop was founded in 2016 by Tyler Garrett!
Return to ET1 Overview to learn more.
Also, learn about how we are the first ETL/Visualization company to deploy Google Ai Edge technology in ET1.1, so that you can use your fingers/hand to solve problems, which turns this into a multiplayer solution!

