by tyler garrett | May 21, 2017 | Business, Google, Wordpress
Submit Yoast Sitemap to Google
Do you want robots figuring out what you want to rank for? No, you don’t! At Dev3lop we tested building a website without an XML sitemap implemented at Google WebMaster tools, it was laughable, taught us a lot, and really built a great use case for using a sitemap.
This wasn’t an entirely huge waste for us actually. The robot showed us a lot of clever word phrases we didn’t think of and expanded our digital marketing touch.
Did google search a Dev3lop Website without an XML Sitemap?
Yes, if you’re getting a lot of traffic, google will come and check out your website! At the time we were getting about 2000 page views per week, and when we started looking to check our queries in the search console, we noticed the robot ranked us sporadically across odd terms and phrases. My favorite was ‘father-in-law backup google drive.’
We did this to validated the necessity of the XML sitemap, rather than just doing it because some guy named Niel wrote a 10,000-word blog saying XML sitemap over and over.
Rather, we decided to build data around this strategy and then optimize our SEO around it.
It’s a lengthy process, the pay isn’t great unless you ranked for something promising, but if you’re savvy with data, it’s worth the time.
Why waste time to test XML sitemap validity when it’s a gold standard?
Do you jump off bridges because everyone else does?
After reading SEO blogs for a year straight, and sacrificing 20-30hrs a week to study and practice. I noticed one overwhelming trait, none of these big names have any data background or any technical experience other than being the person who blogged about it.
It was hard to imagine everyone was jumping on the XML sitemap bandwagon without fully explaining the impacts of not doing it. I’m sure everyone has heard the needle in the haystack comment and how you won’t get indexed if you don’t have the sitemap.
A lot of that rambling on is paid for writers building an SEO style blog, rather than explaining the good, bad, and limitations, they just dump content on content about things that everyone is saying.
The short and simple is, if you don’t submit your XML sitemap to Google, you’re a needle in a haystack and more than likely not optimized onsite for ranking.
If you’ve not submitted your sitemap yet, this article is perfect for you.
Why should I submit my Sitemap to google?
Submit sitemap to Google or else! Or else your letting robots read your site, and they don’t do it that great, and will likely rank you for nonsense.
When you want organic traffic, you need to consider jumping into a few different aspects of web technology. If you already have a website hosted, built and just need to get your sitemap over to google, congratulations! You’re about to take off into SEO space!
Are you ready to submit your XML sitemap to google?
Here’s how to get your XML sitemap open in Yoast, and then accepted by Google for ranking if your site is setup correctly!
- Host a website.
- Build a website, we use WordPress.
- Download an SEO app, we use Yoast.

When you Submit Yoast Sitemap to Google, expect an increase in traffic!
- Turn Yoast advanced options on to ensure XML Sitemap functionality is visible in your WordPress side menu.
- Open XML Sitemap in WordPress side panel, under SEO, if you don’t see it, repeat step 4.

Submit Yoast Sitemap to Google or let a robot read your website, maybe.
- Enable the XML sitemap functionality on Yoast, missing this step?
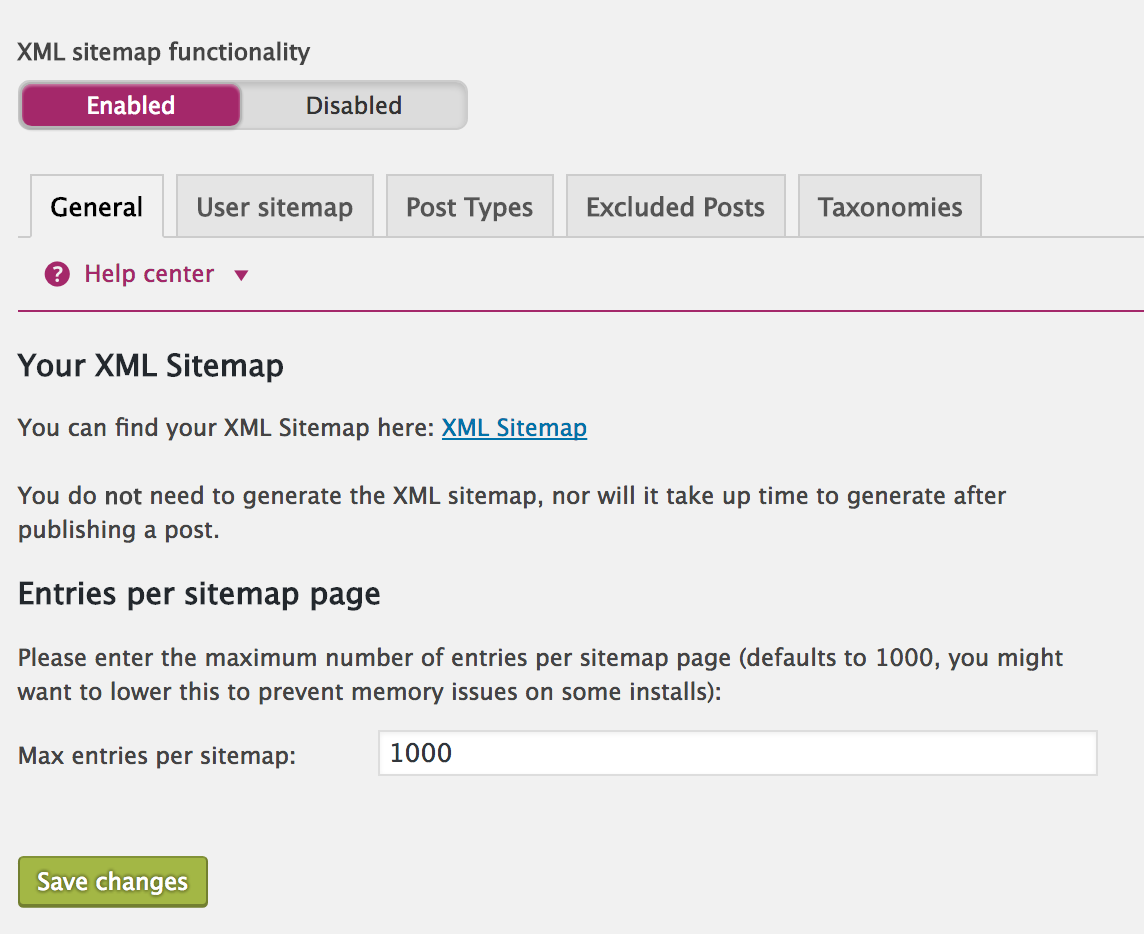
Click XML Sitemap before you submit your Yoast Sitemap to Google.
- Click XML Sitemap and copy your URL. Be sure check it before asking google to see it. If it’s not there when you click it, and you get your 404 message. This is Okay and normal. If you can click on XML Sitemap, and you’re not seeing the correct information, it’s a common thing to need to fix it if it’s not currently turned on.
- In you sidebar, open settings, permalink, scroll to the bottom and just click save. That should do it.

WordPress and Yoast work flawlessly once you click Save Changes. Just navigate to permalinks and click save changes!
- Submit your sitemap by pasting it into Google Webmaster Console aka Search Console.
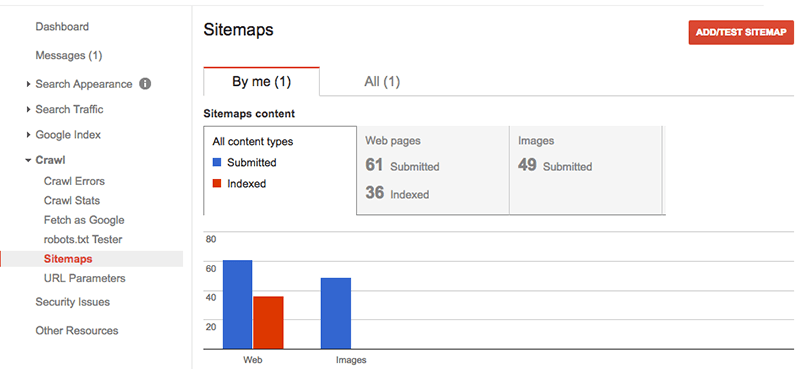
Time to Submit Yoast Sitemap to Google, right?!
Start getting ranked today, right?!
If you have content on your website and have actively been blogging about material that adds value to your customer, it’s a good thing to consider asking Google to come look at your website.
Before you Submit Yoast Sitemap to Google
Before you submit your XML sitemap, it’s really important to understand something about the content on your website. You won’t get ranked with what you have on your website, sorry to say that! Especially if you don’t have a single blog.
Text Headers are important, images are important, and how you optimize each of them together is critical. If these are great, you’re about 5% there in a competitive market. We highly recommend testing your SEO strategies in a keyword phrase marketplace that is not competitive.
For example, trying to rank in SEO is not possible because everyone is 10+ years ahead of you!
We haven’t been blogging?! Woops.
If you’ve put off adding blogs or content, now it’s time to leave the ego at the door, and start sharing what you do with your customers. Otherwise, net authority is not going to be noticeable to any experienced technology professional.
Google has an appetite for lots of content, not minimal simple pages, and with content comes ranking and authority! Although it may look cool, it’s not going to increase your organic traffic.
Stop that minimal stuff, start blogging, get over that fear.
Although it may look cool, it’s not going to increase your organic traffic.
Lastly, regarding: Submit Yoast Sitemap to Google
Regrettably, if you’ve ignored your family, friends, or business partner and never considered picking up a finger to blog, then your website won’t rank very well. You will not be able to expand to a global scale outside of your direct shares, social media outreach, or emailing people for business.
This turns your website into a responsive business, and google is simply offering you the ability to be strategic.
Time to smell the SEO roses, and get ranked like a true expert or use our SEO Experts.
by tyler garrett | May 20, 2017 | Business, Solutions, Tableauhelp
SAML (Security Assertion Markup Language) Forward Proxy Tableau is a technology that was developed by Gerard Braad. It is a powerful tool that allows users to securely access Tableau servers without exposing any sensitive data. This technology is particularly useful for organizations that need to share their data with external partners or customers, as it provides an extra layer of security to protect their data.
The SAML Forward Proxy Tableau works by intercepting the SAML requests that are sent by the Tableau server. It then forwards these requests to the identity provider, which authenticates the user and sends a SAML response back to the forward proxy. The forward proxy then sends the SAML response to the Tableau server, which grants the user access to the requested resources.
One of the key benefits of the SAML Forward Proxy Tableau is that it can be easily integrated with other technologies and platforms. For example, it can be used in conjunction with Single Sign-On (SSO) technologies to provide a seamless user experience. It can also be used with multi-factor authentication (MFA) technologies to provide an extra layer of security.
Another benefit of the SAML Forward Proxy Tableau is that it is highly customizable. It can be configured to meet the specific needs of different organizations and can be customized to work with different identity providers and SSO technologies.
In conclusion, the SAML Forward Proxy Tableau is a powerful technology that provides an extra layer of security for organizations that need to share their data with external partners or customers. It is highly customizable, easy to integrate with other technologies, and provides a seamless user experience. If you are looking for a secure and reliable way to share your data, the SAML Forward Proxy Tableau is definitely worth considering. Also, to ensure we spread good content regarding advanced topics!
SAML on Tableau Server can be easy!
SAML implementation is quick and easy when working at an enterprise company, however, it can also take longer when the Tableau Software is a bigger implementation. A lot more to consider.
This guide is for IT, your pro-level Tableau Consultant, and is for those who want to dive in and get dirty. Also, for those who want to get in the code a bit.
We supply the Github link and other helpful information along with your journey.
Tableau Server has many security layers; this is one and a beautiful way to slice it.
Especially when they have a SAML and Tableau Server expert available.
If this is not the case, there’s a desire to use SAML security. Try out
Here at Dev3lop, we have helped companies with the SAML implementation on several engagements, but not enough to make us experts!
Today, we will review an excellent means of SAML forward proxy, Tableau, found on GitHub.
An example of SAML forward proxy in Tableau
Authentication provider as a SAML Proxy for a Tableau Server configured as a SAML Service Provider (SP).
Let’s pause and ensure we cover what SAML is all about!
Learn how to White Board SAML Forward Proxy!
If you’ve had the opportunity to implement SAML with a company, you probably understand the complexities are not for the non-technical Shadow IT team.
SAML Forward Proxy Tableau is not exactly something that roles off the tung and is also a bit advanced to implement! Have you ever had to whiteboard what SAML and Tableau look like? Tableau Server and SAML forward proxy are not for the light at heart!
SAML (Security Assertion Markup Language) is an XML standard that allows secure web domains to exchange user authentication and authorization data. You can configure Tableau Server to use an external identity provider (IdP) to authenticate Tableau Server users over SAML 2.0. This allows you to provide a single sign-on experience for your users across all the applications in your organization.
SAML Explained by Wiki
Security Assertion Markup Language (SAML, pronounced sam-el) is an XML-based, open standard data format for exchanging authentication and authorization data between parties, particularly between an identity provider and a service provider.SAML is a product of the OASIS Security Services Technical Committee.
Alternatives for configuring SAML with Tableau Server
- Server-wide SAML authentication.
- Server-wide local authentication and site-specific SAML authentication.
- Server-wide SAML authentication and site-specific SAML authentication. (More at Tableau Software)
Does Tableau SAML affect Workbook Security in Tableau Server?
SAML will not be handling any Tableau Server content security; rather, rather user is going to be authenticated by SAML IDP, not by Tableau Server.
Suppose your SAML guy/gal asks! Be sure to let them know Tableau Server will take care of the heavy lifting.
Let’s continue on our GitHub journey!
SAML Forward Proxy Tableau – GitHub Readme
Tableau supports the HTTP-Post binding for SAML Requests and will always sign the requests.
Some IDPs cannot be configured to support HTTP-POST but only support HTTP-Redirect.
Also, the IDP may not require a signed request.
Usually, signing the Request in Tableau does not alter the ability of the IdP to process the Request. Still, sometimes it is beneficial to reduce the size of the Request so that intermediate servers can store the Request in a cookie.
SAML Forward Proxy Tableau – GitHub Proxy runs as the Web Server
This proxy runs as a web server on a port defined in config.js and will work with HTTP or HTTPS. It is effectively a one-way proxy, hence the term SAML Forward Proxy. This example does not proxy the SAML Response. The Response from the IdP is sent directly to the Tableau Server (via the user agent, of course)
Web Sequence:
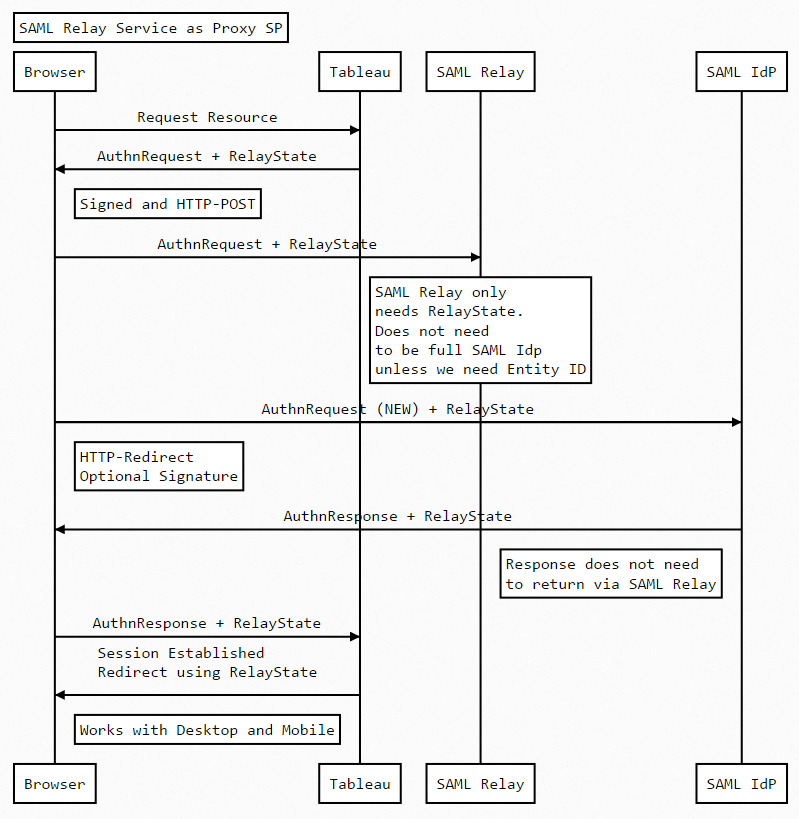
SAML Forward Proxy Tableau – GitHub Usage
“`bash
$ git clone https://github.com/geordielad/saml-forward-proxy.git
$ cd saml-forward-proxy
$ npm install
$ # Make changes to config/config.js as needed. Add SSL key/cert if needed. Add SAML private key if needed.
$ npm start
“`
SAML Forward Proxy Tableau – GitHub Example List Continued
Run the proxy on localhost with http on port 3000.
Use HTTP-Redirect to the original IDP, and do not sign the Request.
1. Ensure that your IPP is working as expected.
2. Stop the Tableau Server.
3. Get a copy of the IDPS metadata. Note the HTTP-POST endpoint of the SingleSignOnService and change the Location attribute to http://localhost:3000/saml_proxy
4. In config/config.js:
– Update the entryPoint attribute to the original HTTP-POST SingleSignOnService Location.
– Comment out the privateCert attribute. This will ensure that the Request is not signed.
– The example code will update the callback and issuer attributes from the Request sent by the Tableau Server.
SAML Forward Proxy Tableau – Javascript
“`javascript
const fs = require(‘fs’);
module.exports = {
development: {
app: {
name: ‘Passport SAML strategy example’,
port: process.env.PORT || 3000
},
passport: {
strategy: ‘saml’,
saml: {
path: ‘/’,
callbackUrl: ‘https://yourSP.com/saml_callback’, // DYNAMIC FROM ORIGINAL REQUEST – See routes.js
entryPoint: process.env.SAML_ENTRY_POINT || ‘https://youridp.com/entryPoint’,
authnRequestBinding: process.env.SAML_AUTHN_REQUEST_BINDING || ‘HTTP-Redirect’, // Change to HTTP-POST if required
issuer: ‘https://saml_sp_entityid’, // DYNAMIC FROM ORIGINAL REQUEST – See routes.js
//skipRequestCompression: true, // Optional depending on IdP
//acceptedClockSkewMs: -1, // Optional depending on IdP
//disableRequestedAuthnContext: true, //Optional depending on IdP
//privateCert: process.env.SAML_PRIVATE_CERT || fs.readFileSync(‘./tableau_ami_sp.key’, ‘utf-8’), //Uncomment if Request Signing is required.
//cert: process.env.SAML_CERT || fs.readFileSync(‘./okta.cert’, ‘utf-8’) // Not needed because we are not processing AuthnResponse
}
}
}
};
“`
SAML Forward Proxy Tableau – GitHub Example List Continued
5. Start the proxy if necessary. npm start.
6. Restart the Tableau Server and test the proxy by calling your Tableau Server in the Browser. View URLs and any public pages (for example, sites and projects) will work as the proxy will forward the RelayState.
7. test the SAML Forward proxy with Tableau Desktop and the Tableau Mobile App. They should work as expected.
This example code has been tested with Okta and Azure AD.
SAML Forward Proxy Tableau – Community Rocks
Another solid find in the Tableau Community world. I am thrilled to share this with our audience and, hopefully, more future Tableau SAML implementations!
by tyler garrett | May 10, 2017 | Business, Solutions, Tableauhelp
A Way to Upgrade Tableau Server v8 through v10. Also, the method to Restore Tableau Server too!
Upgrade Tableau Server quickly – first please read below statement before beginning the upgrade! These are safety tips and explaining our experience.
Upgrading Tableau Server is Easy, Fast, and Painless!
Tip: Steps 1-3 are not necessary for later versions of Tableau Server. Check out our video embedded below.
It’s not a lot of steps. Do not skip steps, they are designed to keep everything safe and backed up. I know it’s a common practice to skip to the part that you think you should be on. Be aware skipping may cause more downtime.
If the Server is active, the best practice is to schedule an outage across all the users. To ensure during the process no one loses their work by mistake.
How to Upgrade Tableau Server Steps and Best Practices
- Run CMD as admin, shift right click then run as admin.
- Stop the service
- Check if down
- Generate backup file
- http://kb.tableau.com/articles/knowledgebase/server-maintenance
- tabadmin backup <*directory w/ file name*>
- copy and paste this file to the VM desktop and the local machine desktop
- Keep more than one copy of this during the upgrade process, especially if there is only one instance of tableau server running (production instance)
- If you’re unable to get a clean VM to do a fresh install on: Do the following to clean up all old metadata and tableau related files
- Full Uninstall Tableau Server
- Add/remove programs – Uninstall Tableau Server
- OR Use the uninstall .exe in the Root directory
- If tableau server was ever installed on the C drive (check always):
- Open c:\programdata
- If c:\programdata\tableau exists, remove it after the uninstall
- Including any Tableau Server related directories
- Restart the OS
- Navigate to www.tableau.com/Server
- Download latest version of Tableau Server
- Install Tableau Server
- NOTE: Use anything other than the OS Drive (C:) to avoid the
- generation of c:\Programdata
- avoid competition for resources with the OS
- Install Tableau Server on its own drive!
After Upgrading Tableau Server – Restore Tableau Server – Steps and Best Practices
Okay, you are done with above, now you need to restore Tableau Server. Take your time, make sure everyone is aware of this outage, don’t skip steps.
Restore Tableau Server can be done quickly if your backup isn’t massive.
- Restore from the previous Backup
- Test connection to localhost
- check content
- users
- security
- etc
- Restart VM
- Update any scripts to point at new BIN directory
- Update environment variables to point at new BIN directory
Our Experience Updating and Installing Clustered Tableau Server
Here’s a picture of Tyler Garrett, onsite at GoPro – pointing at the GoPro Tableau Server frontend.

Hanging with the GoPro crew, helping customize their Tableau Server frontend and architecture for long term scalability for years to come. Generated custom scripts, custom UI, and advanced Tableau Server training. Holding a GoPro camera!
Steps that explain how to protect your environment and content on Tableau Server. Also to help minimize the outage. Do your best to follow along.
These steps work if your environment settings are ready for the Tableau Server Upgrade. Grab your sysadmin if there are lots of interesting permissions or read/write problems.
Server Best Practices we recommend
Run a backup at any time with recent Tableau Server versions. We would recommend running a backup daily at night. If you have a lot of content, it will take a little bit to backup everything.
Sometimes can cause outages, be prepared. Work with senior staff before trying to backup a massive file. There are lots of versions of Tableau Server running in enterprise companies.
Warning Before upgrading Tableau Server
Some of these moves can cause an outage. Work with senior staff before trying to backup a massive file. There are lots of versions of Tableau Server running in enterprise companies.

Hanging with the GoPro crew, helping customize their Tableau Server frontend and architecture for long term scalability for years to come. Generated custom scripts, custom UI, and advanced Tableau Server training.
by tyler garrett | May 8, 2017 | Business, Databasehelp, MySQL, Solutions, Tableauhelp
Start MySQL on Mac OSX or build a farm of spreadsheets? We will be walking you through building your database on your personal machine. Start MySQL on Mac OSX and Get Collecting! Ever considered collecting data to process MySQL? When ramping up you need to start the MySQL instance on your Mac OSX. This is a quick guide!
By the end of this blog, you will understand how to get your MySQL Server started on your Mac OS.
Now that you have MySQL on your Mac, what’s next? Start MySQL on Mac OSX!
- The first step is installing MySQL on your mac.
- The next step is starting MySQL.
- Open your settings and find your MySQL icon.
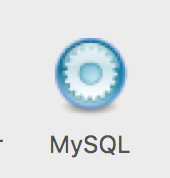
Mac OS MySQL button in Settings.
Click Start!
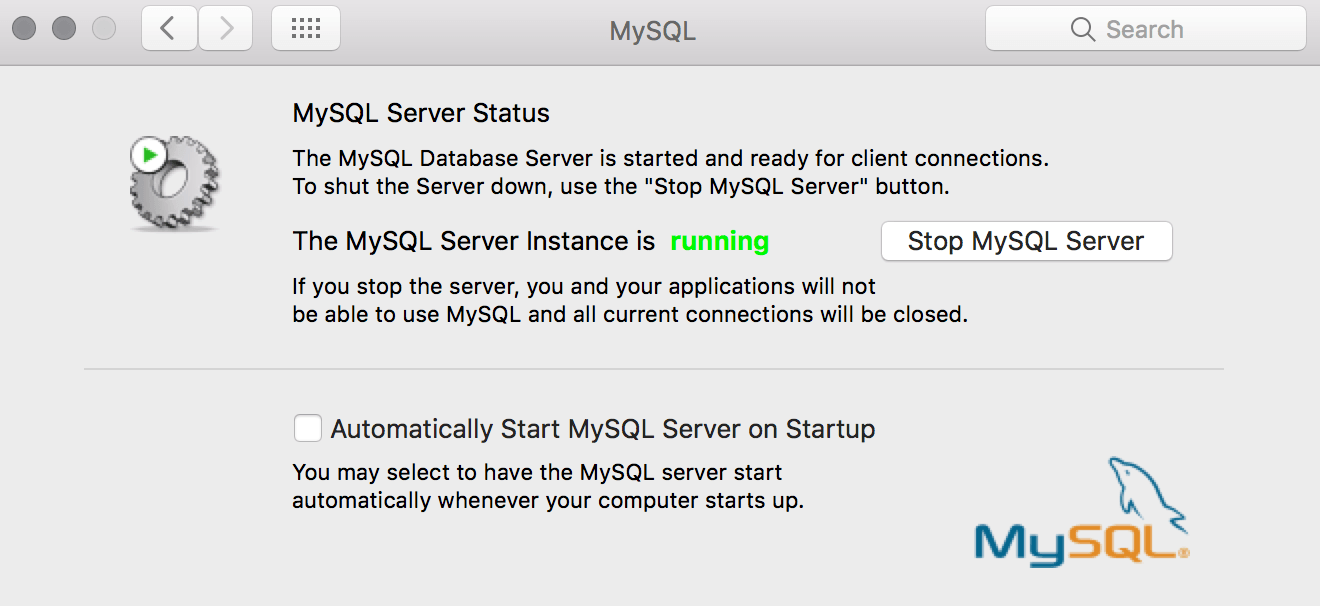
You can start and stop your MySQL database manually here.
More MySQL Server Startup Details
We want to kick off a component of the service, it’s called launchd.
To enable the launchd service – we want to jump into the easy mode first!
If you’re coming from SSMS and looking to have a similar feel with the Mac OSX MySQL install. That’s our objective too.
Download MySQL Workbench!
Then follow along in our next tutorial on How to Create a Schema in your MySQL Workbench on Mac OS.
If you’re not perfect, you may forget your root password. We cover how to reset your root password here.


